HOW TO FIX YELLOW TEETH IN PHOTOSHOP
Intro
What’s up Photoshop fam? Today we’re gonna fix a common problem that you find in a lot of photos. How to fix yellow teeth in photoshop. Its Super easy so stick around. I’m Rick Navarro and this is the Pixel Laundry Photoshop Academy.
***Please note, that the blog entry below is the transcribed audio from the video for this entry. To get the full experience to be sure to watch the video on the page below or go to the Pixel Laundry Photoshop Academy YouTube channel. Be sure to subscribe to get all the latest tutorials! Also if you need retouching services, we encourage you to check out our portfolio of work at Pixel Laundry. We are a clipping, background removal and retouching specialist that services traditional and online retailers, advertisers and entertainers. Please don’t hesitate to reach out for some free samples and an estimate on your project. ***
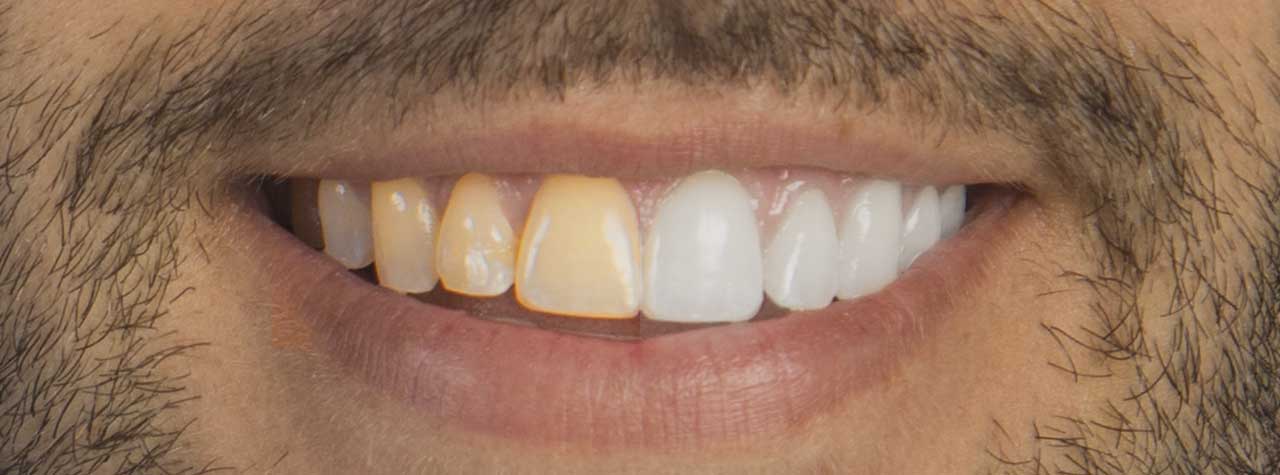
Alright guys, so let’s just go ahead and jump right into it. Today I’m going to show you two different ways that you can fix these and its super simple again. No matter how clean you keep your teeth, there’s always a little bit of staining on them and it’s actually okay. You don’t want to blow out teeth completely bleach white, they look crazy. I’m going to show you an example here in a second but this is a simple technique for you to use on any image that has some teething, it that just needs some kind of general cleaning. If it’s going to get like exhaustive, if it’s like crazy teeth and you you need to do like more retouching than like color adjusting, that’s a completely different thing but this is a quick way for you to adjust teeth okay?
Color Based Selections
So I’ve got this image here. I’ve actually already worked on it but I’m going to start from scratch and again duplicate that base layer and you might think you need to get in here and do some crazy selections which you can and if you want to be super tight by all means do that make your selection super tight but if you wanted to move really really quick, you could do a color based selection and isolate the colors of the teeth. So that that way you’re only affecting the colors in the teeth and not like everything else around it. So I’m going to make a quick selection with my marquee tool and based off of the color that I’m going to source, I’m going to use a hue sat layer and based off of that yellow reddish color. I’m going to pull that color out now, if I slide down, you can see if I slide it all the way down you can see that there’s yellows in the skin and there’s Red’s in the skin. Now some of that is the bounce light that’s happening from the mouth back on into the teeth so that’s why you’re seeing you know some of this outside area be affected and obviously the teeth are being cleaned up as well so if I turn it off and turn it on, turn it off and turn it on now just for the sake of arguing I’m going to very loosely clean up this mask and I can be loose because again I isolated the color to just the yellow, the yellow tonal range and if you look right here you’ll see this little slider right here is, is your range is actually your color range.
So this is one of my favorite tools in Photoshop to use especially if I’m trying to move quickly and I’m trying to isolate colors and I don’t have a lot of time for super meticulous masks. Most of the time I’m hardcore, I’m a bit of a Nazi when it comes to masks and keeping them tight but again it is always about balancing the amount of time and effort and quality versus the project. So if a project calls for a super super tight detail and there’s a lot of time and the client is paying for that level of a service then I’m going to go ahead and make sure everything is tight but if I need to move quick, maybe the budget is really tight, maybe the turnaround is really tight, this is a quick way to get in there, make the necessary adjustment still look good budget done What I need to get done okay? So as you can see if I’m going to hit the ALT option key here and I’m just setting the mask so you can actually see what happened but I paint it off the mask here. Now up at the top it looks like I’ve got a little bleed over so that’s why the top here, you can see a little bit of the yellow up at the top. So let’s just paint that back on with a soft brush, I’m going in here and painting yellow out down here at the bottoms where there’s a little bit of this glow happening, that yellow glow coffee tea coke anything that’ll stain a t-shirt, will stain your teeth at least that’s what they say. Now you can see by desaturating the color they actually almost went a little gray, they’re actually kind of like blue grayish. So this is why this technique isn’t always my favorite.
Masking
You could in conjunction with the hue Sat layer add layers’ level adjustment and use that mask as your mask. Let’s go ahead and do that real quick. I’m putting a levels adjustment and I’m going to clip it down. If I hold down the ALT or option key here and click, it’s going to use basically the mass that’s under it. I like to use clipping a lot because the more you stack masks unnecessarily so the larger the file gets, it’s a lot more information for Photoshop to maintain in the file but if you use one mask and then say I’m going to use all these adjustments and bind them to this one mask, it’s more economical way of using your masking system. So I use this levels adjustment here and I’m going to pull it up. Let’s see if it does it, who and again not supernatural okay and again and the reason is because it’s even when your teeth are white you have a little bit of color in them, whether that’s the bounce light in the room, that’s the light coming from your lighting source, the Sun or a strobe or a hot light or whatever the color of your mouth reflecting back into your teeth, there’s always a pinch of color. So you don’t want to de-saturate the color entirely because it makes it look really really artificial. So what I like to do is actually instead of pulling out all of the color like here I’ve de-saturated entirely, I’m going to grab the lightness slider and slide it up and I’m actually going to pull some of that color back, this tends to give a lot more natural of a look. So if we zoom back out that’s off and that’s on, that’s off and that’s on. Now that’s kind of the start that’s about where I would go, this is where I would say you can’t really tell, you weren’t, you wouldn’t really be sure okay? Now from here I could go a little further and again maybe I add that levels adjustment. Let’s reset that back to the beginning and I’m just going to pull the mid-tones. Actually now we’re getting a bright white smile that would pass as maybe a natural smile, which is really what I want it doesn’t look artificial and because my mask is loose there’s some really soft blending and edges that visually you’re not going to be able to see.
In Conclusion
Here’s your before, here’s your after, I might tighten this mask down just a pinch because it’s already bothering me like I said just a little bit especially on those bleeding kind of fuzzy edges where it starts to get a little soft and hazy but again a little bit of color inside of the teeth it’s actually not a bad thing and it works to sell the image.
Alright guys, that’s it, told you was going to be quick. That’s all I got for you. Be sure to LIKE, subscribe and hit that notification bell so that you can get updates on our future videos. If you’ve got an idea for a future show, comment down below. Until next time Photoshop fam, be real. Catch you later.